SSH IPv4 to IPv6 using TUNNEL BROKER

In previous article, we discussed the challenges for SSH connection between IPv4 and IPv6. This is a tutorial post on how to SSH from IPv4 network to IPv6 network using TUNNEL BROKER.
What is Tunnel Broker
An IPv6 tunnel is a type of network tunnel that allows IPv6 packets to be transmitted over an IPv4 network or vice versa. Tunnels are often used when a device or network needs to communicate with another device or network using a different protocol, but the underlying network does not support that protocol.
One of the way of using Tunnel is by using a Tunnel Broker Service. IPv6 tunnel broker is a server that provides tunneling services to clients, allowing them to connect IPv6 networks or devices to IPv4 networks or devices. Tunnel brokers work by creating a tunnel between the client and the broker, and then routing traffic between the client's IPv6 network and the IPv4 network.
Popular Tunnel Broker are Hurricane Electric & Route48
Tunnel Broker uses SIT (Simple Internet Transition) tunnels, also known as IPv6-in-IPv4 tunnels, are a type of tunneling protocol that allows IPv6 packets to be transmitted over an IPv4 network. SIT tunnels are used to provide IPv6 connectivity to devices on IPv4 networks, such as the Internet, until native IPv6 support becomes more widely available.
How to create Tunnel
For using a Tunnel Broker service, you need to create an account in. I prefer Route48 as it has a better service dashboard and features.
Log in to the dashboard, and you can create a tunnel as shown below by choosing a server from the drop-down menu and the remote host, which is basically your public IP (IPv4) of the system from which you want to connect to an IPv6 host.
Before the tunnel can be created, Route48 server will try to ping and reach your remote host, and here comes the real issue. In most cases this check will fail, due to your Router configuration or the network you sit behind and so the tunnel creation fails.
This can be seen in the image, in the red section.

Fortunately, and this is why I like Route48, there is another option which works seamlessly using WireGuard technology. Read more about WireGuard at the end of this post.
How to create WireGuard Tunnel
Step1: Here while creating an IPv6 tunnel, Choose WireGuard as the tunnel type option as show, choose the server location and create a tunnel
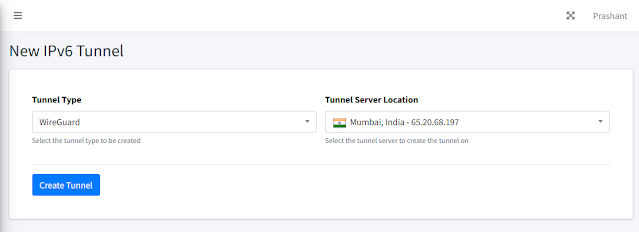 Your tunnel will be created and shown in the Tunnel list.
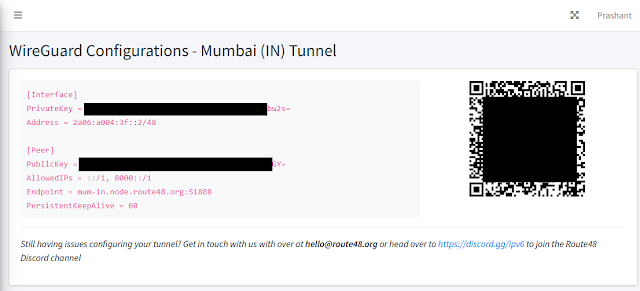
 Step 2: Go to the Config section of Tunnel to get details about WireGuard
configuration. The page will look like this. This config data is needed later
to configure the Tunnel on our system.
Step 2: Go to the Config section of Tunnel to get details about WireGuard
configuration. The page will look like this. This config data is needed later
to configure the Tunnel on our system.
 Step3: Now install WireGuard app for your operating system - WireGuard is available
for Windows, Mac, Linux, Android and iOS. Head on to this link to download and
install
WireGuard.
Step3: Now install WireGuard app for your operating system - WireGuard is available
for Windows, Mac, Linux, Android and iOS. Head on to this link to download and
install
WireGuard.

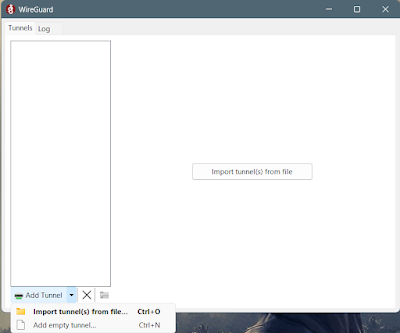
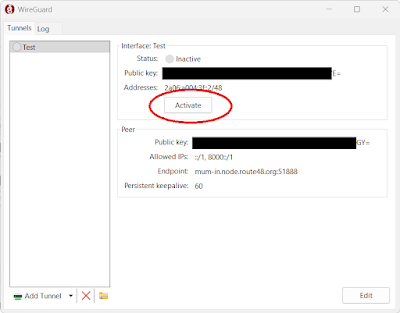
Step 4: Next, open the WireGuard application. On the main page, you will get an Add Tunnel button. Click the arrow beside the button and choose Add Empty Tunnel
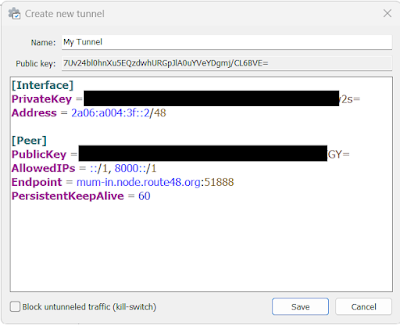
Step 5:** Give a custom name to the tunnel. Then delete all the content in the text box and paste our WireGuard tunnel config data from Route48. Then click save
Step 6: The new Tunnel will now display in the list. Press the Activate Button and check status. Your tunnel should be up and running. Your IPv4 network can now speak to IPv6 Netwoks
Step 7: Use the normal SSH command to connect to an IPv6 Host
ssh username@ipv6 address
About WireGuard
WireGuard is a free and open-source software application and communication protocol that implements virtual private network (VPN) techniques to create secure point-to-point connections in routed or bridged configurations. It was designed with the goals of ease of use, high performance, low attack surface, and low resource consumption. WireGuard is a relatively new VPN protocol that has been gaining popularity due to its simplicity and security. It is designed to be run on devices with low-power processors, such as routers, and can be easily implemented in software without the need for specialized hardware. WireGuard is also notable for its use of modern cryptography techniques, such as curve25519, ChaCha20, and BLAKE2, which are designed to be resistant to attacks and to provide high performance. This concludes the SSH from IPv4 to IPv6 series.
Take Care, Wear Mask and Save Soil